Showing posts with label white. Show all posts

2013/02/26

Abstract, again

Fashion mold

Random blebs of colour seems to be my favourite design. This one reminds me a bit of mold (an old yoghurt way back in the fridge? I can't be the only one to keep forgetting those). "Eeeew", you might say. "Oh, no", I'll answer, "it's fashionable mold".
 
I really should throw that yoghurt out.
Products used:  
OPI Alpine Snow
Zoya Rica
A homebrew experiment
...and mixes of the two latter

2013/02/24

Marimekko (III)

Inspired by Marimekko

I recently purchased OPI Alpine Snow, which is the first ever decent white polish I've owned. This one actually goes on smooth and is opaque in two layers (one, if you spread it on thick, which personally I try not to do). I used to feel a resistance against designs with a white base, but that's over now. Hooray for OPI!

Here's an accent nail design that is loosely inspired by a Marimekko bag. I say loosely as I didn't have a picture of the bag in front of me while painting this. It's freehand with a bag in the back of my mind.

Products used:
OPI Alpine Snow
Nubar Hot Yellow
Wet n Wild Ebony Hates Chris
Deborah Lippmann Addicted to Speed Top Coat

2013/02/05

Abstract + Caviar

Abstract greyscale with caviar beads

The last couple of weeks, my computer has been breaking down every time I'm trying to update this blog. It's been a shitty computer from the beginning, Minecraft has never run properly, for example. That's ok. You need a monster computer for that anyways. But, a year ago, I was not able to play Minecraft at all anymore. I was ok with that, and moved back to playing Heroes of Might and Magic III, possibly the greatest game ever made. Then, all of a sudden, I could not even play that. It's from 1998, darn it. It should be ok, I would think. But no. Oh, well. And now, here I am, hoping that I will be able to get through a blog post before my poor computer cracks under the pressure.

Here's hoping, because I've got a neat caviar manicure to show you:

This is a really quick and simple thing to do. Black background, freehand random white stripes, smudge them with your finger, fill in some grey, black and white after a fashion. Add blobs of caviar beads. Done!

Products used:
Deborah Lippmann Fade to Black
OPI Alpine Snow
(Grey is a mix of the two above)
Ciaté Headturner Caviar Beads
Deborah Lippmann Addicted to Speed Topcoat

UPDATE:
As requested, here's a step by step tutorial.
Please excuse the badly focused pictures - you need to be a bit quick for this to work,
and taking pictures between the steps is neither recommended for the quality of the pictures nor for the quality of the manicure...   

2012/11/28

Abstract (VI)

Black and White and Pink

For me, meditation could be defined as "to without aim or goal paint nails randomly while watching Game of Thrones for the fourth time". Of course, third, fourth or fifth time doesn't really matter, as long as I don't have to pay attention very closely. The scenes at the Wall are the best for this - it's all just snow and men in black garbs anyway, nothing much that changes between the cuts. Perhaps the white snow covers and black crows still managed to nestle their way into my head for this mani, because black and white was what I ended up with:
 

I couldn't resist embellishing he Robert Motherwellesque abstract background with some pink rhinestones. I really enjoy the contrast between the raw and random black and white pattern with the pink jewels - a thing that otherwise would be too cute for me to stomach.
  
Products used:
China Glaze White on White
Wet n Wild Ebony hates Chris
Rhinestones from Claudia Nail Decorations


2012/10/11

Inspired by a textile

The Fox and the Grapes

This freehanded accent nail manicure is inspired by one of my favourite textiles: "Surt sa räven" designed by Kerstin Boulogner and produced by Swedish textile company Almedahls. The Swedish proverb "Surt ,sa räven" ("Sour, said the fox") refer to the fable about the fox and the grapes, though the grapes have been translated into rowan berries in the Swedish version. So, there you have it, tiny foxes and beige rowan berries:
 
Lower left picture courtesy of Almedahls
Products used:
Essie Case Study
China Glaze White on White
Wet n Wild Ebony Hates Chris
Chanel Holiday

2012/09/22

Picture Dump (I)

Just a bunch of pictures
Here's a few more or less successful manis from the last few weeks. I haven't gotten around to post them before due to either laziness or crappy quality of picture and/or nails. So please excuse any stray polish on cuticles (eh, eponychium, to be correct), hang nails, annoying instagram filters, etc... Instagram filters are, by the way, a guilty pleasure of mine. But you should know that I try use them to show of the colours as close to how they look in real life as possible.


I really like the ring and little finger here. They remind me of poison frogs!


Water marble on my nephew Jack.
Hey, I meant them to be uneven!

Ooh, I liked this one. Colour themed and with some bare nail on the middle finger.

A variation of this mani. I loved the other version, but this came out a bit too cute and bridal for me.

This is probably the kind of mani I've worn most in my life. It's quick and simple to make, and it shows of some bare nail which I've always been partial to.

2012/07/22

Stripes (I)

Gloopy stripes

Inspiration: this video tutorial

Just a quick picture post, as I'm currently getting ready for a five week trip to Greenland, where I will have no internet access and officially no polish access either due to limited baggage weight. But the weight of a single, tiny polish bottle has never crashed any helicopters as far as I know... Now to the problem of choosing which one can come with me. Possibly the dark grey Paddington depicted below:

I kind of jelly sandwiched a few of the stripes to add some depth. So, first a base of Paddington, some stripes, My Pointe Exactly, more stripes... I'd love to try this in even more steps when I have some more spare time.

Products used:
Nails Inc. Paddington
Depend Art Liner in white  
OPI My Pointe Exactly
Nails Inc. Chelsea Square

2012/07/17

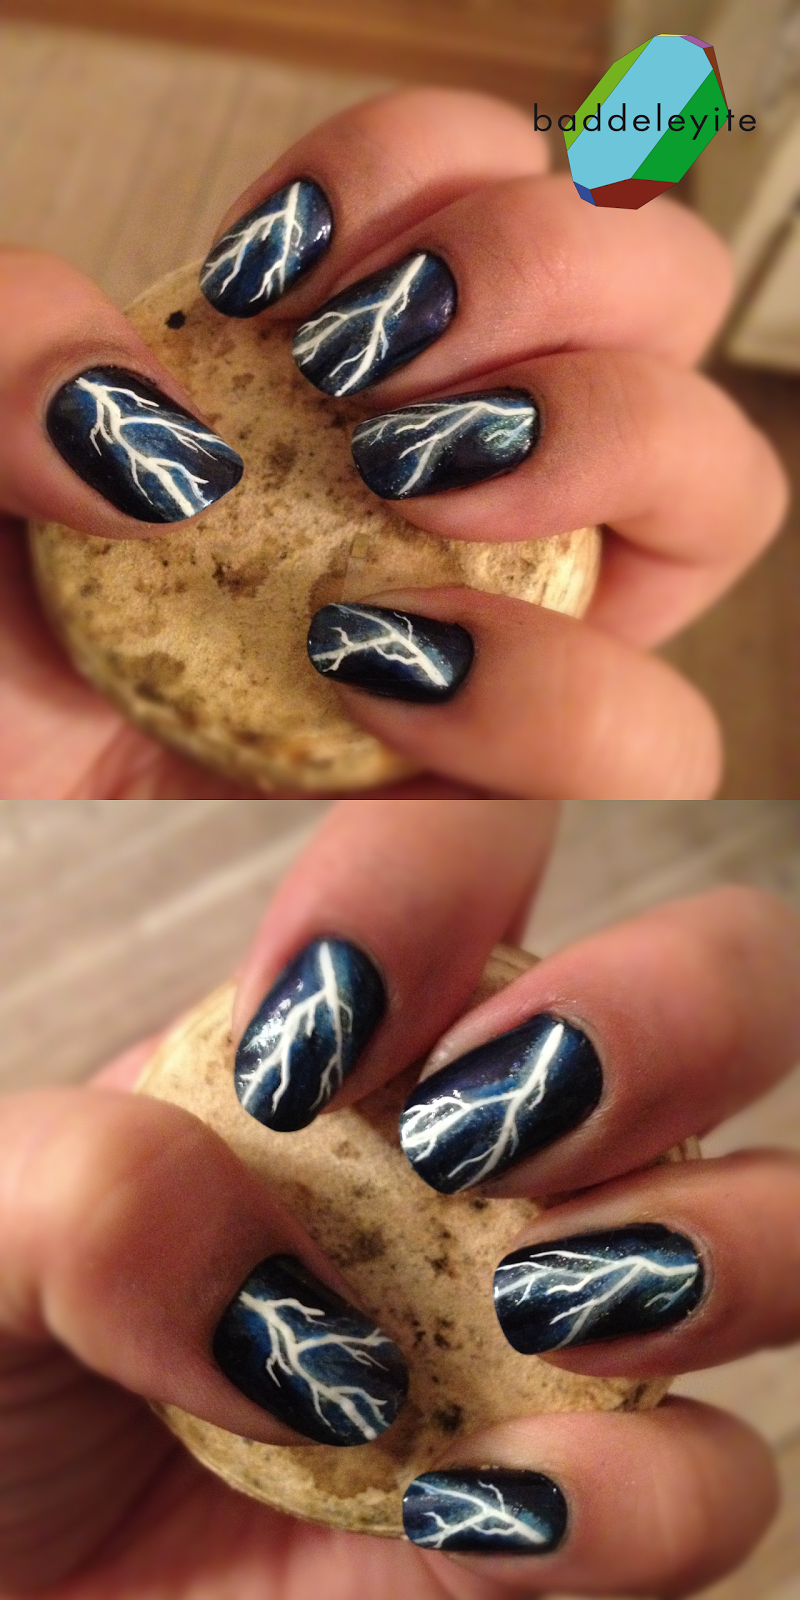
Thunder

Electrostatic Discharge

Inspired by: this post by geebsterlove on redditlaqueristas, this youtube tutorial, and this picture I googled forth. 

Thunder! Lightning! TheamountoftimeIputintomanicuresisfrightning. You better knock, knock, knock on wood, baby.


Products used:
OPI Royal Navy
Dior Blue Denim
Nails Inc. Electric Lane
Depend Art Liner in white
OPI Don't Touch My Tutu
OPI I Have a Herring Problem
China Glaze Ride the Waves

2012/07/10

Fossil

Rawr.

Inspiration: Carr et al. (2005) (no, not really - more like Spielberg et al. (1993))

Again with the bedazzled pinkie? Yup, that one is staying on until it chips. But at least I have a fossil T-Rex and a ladybug to show you, along with some sparkly Nails Inc. goodness.

One of these days I'll make a ladybug tutorial and take some better pics.

Products used:  
China Glaze White on White
China Glaze Liquid Leather
China Glaze Pool Party
Nails Inc. Bloomsbury Square
Nails Inc. New Burlington Place

2012/07/08

Abstract (III)


Two quick tutorials

Inspiration: tutorial requested by reddit user FreeBird69

Again, this is a spin-off of the mani shown below. Tutorial for the ring finger design can be found here. This post will show how to do the middle and pinkie designs.  
Original blogpost
  

Middle finger: Lollipop dots


Start with your base colour. I choose a neon (China Glaze Pool Party), so I painted my nails white first to make the colour pop. Sidenote: as you can see, I'm not ready to part from my ring finger blob design just yet.

Slap some french tips on. I used China Glaze Liquid Leather. There's tons of tricks for making french tips (including but not restricted to taping with hole reinforcements or tape cut to fit, or even stamping). However, I recommend freehand. It's easy enough and practice makes perfect!

Then, I randomly applied some white dots. I used the big end of a regular pin needle and China Glaze White on White which is nicely opaque.

Then use the other end of a pin needle to make tiny black dots in the centre of the white ones. I'm holding my home made dotting tool, but a regular needle of course works just as well.

Use a striper polish or brush to make small tails on the white dots as pictured. I used Depend Art Liner in white. If you like, you can wait until after this step to do the french tips, but as they are more prone and unforgiving to fuckups than the dotting and striping, I prefer it in this order.

Pinkie: geometric design

Start with a white base. I have two coats of ChG White on White.

When the white is completely dry, put a piece of tape vertically down the middle.

Paint black (I have ChG Liquid Leather) and remove the tape. Some like to wait until the polish is a bit dry, some do it at once. I've never had trouble either way so I don't have a preference.

You will end up with a nice geometric design like this (if not, you can easily use stripers to fix it, or hide it in the next step). Let's risk messing this design up in the next step!
I totally gif:ed this for you. If you're using the white striper, start in the white, close to the black, and drag over into the black - and vice versa for the black striper. That way you get nice pinch outs of the lines.
Here's the result.
And Bam!, that's it.
Just to conclude this weekend of 7 manis: in the end I went back to that blobalicious ring finger as the accent:

How McQueenish of me.

Products used:
China Glaze Pool Party
China Glaze Liquid Leather
China Glaze White on White
Depend Art Liner in black and White
China Glaze Pelican Grey
Isadora Wonder Nail 651: Silver Sparkles
Isadora Wonder Nail 65: Smoky Grey

Abstract (II)

Radiating gloopiness

Inspiration: I found this video helpful for the technique

I really liked the ring finger design of my last mani, so I scrapped the others and tried it out as an accent nail:  
I love this mani! The silver (Isadora 651) is gorgeous but hard to show off in pictures.
Quite a few of my fellow redditlaqueristas also had this design as their favorite, so by popular demand and withouth further ado, here's a quick tutorial:  
  
Here's my set up. The needle is a regular pin needle in home made fimo clay casing, but you can use a tooth pick or any other dotting tool. If you want, you can tape your finger beforehand for easy clean up.
Put blobs of polish as pictured. I messed up one of my blobs, but it couldn't matter less for this design.

Wait until your polish blob is a gloopy, stringy mess. I only have two hands, so I had to take this picture on the side.
Now go from blob number one via blob number two and out to the sides and back again. Pick up a gloopy string every time you cross one of your blobs, and continue until you like the design.

Add another blob of polish and a  rhinestone to your focal point. Here, I experimented a bit more with the pinkie and it came out quite arachnoid. My favourite is still the ring finger as the highly contrasting colours show off even the thinnest lines.
A few additional things:
  1. Be careful with the clean up process, as the lines can hang freely in the air between the highest point of your nail and cuticle or skin on the side. Make sure they are attached to the nail if you don't want to risk shifting your whole design. You can easily do that by pressing them very gently down, or "cut" them of with acetone to make them fall down.
  2. I used an art liner because it is very gloopy in itself, but any polish works if you wait the right amount of time. Experiment!
  3. This video (same as linked under inspiration, but I don't want you to miss it!) is helpful.


Products used:
Isadora Wonder Nail 651: Silver Sparkles
China Glaze White on White
Depend Art Liner in black

2012/07/03

Marimekko (I)

Pakkanen

Inspiration: Marimekko fabric Pakkanen by Maija Louekari
 
Pakkanen means frost in Finnish. You might say that the design would fit better on a cold winter day, but I say: au contraire! what's better to cool of on a hot summer day than some frost on your nails?


Polishes used are China Glaze White on White, Ride the Waves and Liquid Leather, and Depend nr. 36.