Showing posts with label grey. Show all posts

2013/02/05

Abstract + Caviar

Abstract greyscale with caviar beads

The last couple of weeks, my computer has been breaking down every time I'm trying to update this blog. It's been a shitty computer from the beginning, Minecraft has never run properly, for example. That's ok. You need a monster computer for that anyways. But, a year ago, I was not able to play Minecraft at all anymore. I was ok with that, and moved back to playing Heroes of Might and Magic III, possibly the greatest game ever made. Then, all of a sudden, I could not even play that. It's from 1998, darn it. It should be ok, I would think. But no. Oh, well. And now, here I am, hoping that I will be able to get through a blog post before my poor computer cracks under the pressure.

Here's hoping, because I've got a neat caviar manicure to show you:

This is a really quick and simple thing to do. Black background, freehand random white stripes, smudge them with your finger, fill in some grey, black and white after a fashion. Add blobs of caviar beads. Done!

Products used:
Deborah Lippmann Fade to Black
OPI Alpine Snow
(Grey is a mix of the two above)
Ciaté Headturner Caviar Beads
Deborah Lippmann Addicted to Speed Topcoat

UPDATE:
As requested, here's a step by step tutorial.
Please excuse the badly focused pictures - you need to be a bit quick for this to work,
and taking pictures between the steps is neither recommended for the quality of the pictures nor for the quality of the manicure...   

2012/11/20

Hand-placed glitter (I)

Treasure chest

I recently bought some loose glitter to be able to try my hand at placing small glitter pieces one by one. It must be said that Polish All the Nails is the queen of this method, obviously having a steady hand and a cornucopia of patience to cover all her nails in mosaics and, as she often calls it, mermaid scales of glitter. Now, I wasn't about to let my first try be a 7 hour sitting, especially not as I have a cold and the risk of sneezing glitter all over the kitchen table is quite high. Glitter is, after all, the chlamydia of crafts. So I decided to just try the method out and see where it would take me.
 Apparently, my mind found itself wandering into the pirate treasure chest domain.The picture doesn't show it off very well, but there's two layers of the fabulous gold glitter that is Deborah Lippmanns Boom Boom Pow underneath the hand-placed glitter. It really gives of a vibe of a chest full of ducats, disseminated precious gems and a necklace of rubys. The grey background helps to make it not over-the-top pirate booty, which of course could be achieved with a gold[glitter] background if one would wish.  
Placing the glitter was a lot quicker than I thought. But then again I kind of work with these things - moving crystals of a couple of tens microns around under a microscope. The layers of polish underneath (two layers of Deborah Lippmann Waking up in Vegas, two of Boom Boom Pow) were so thick and thus slowly hardening that I could place all glitters before they had really hardened, instead of constantly having to add more topcoat. All in all, a very meditative process and a result I enjoyed wearing.  
  
Products used:
Deborah Lippmann Waking up in Vegas
Deborah Lippmann Boom Boom Pow
Loose glitter 
Depend Topcoat

2012/07/22

Stripes (I)

Gloopy stripes

Inspiration: this video tutorial

Just a quick picture post, as I'm currently getting ready for a five week trip to Greenland, where I will have no internet access and officially no polish access either due to limited baggage weight. But the weight of a single, tiny polish bottle has never crashed any helicopters as far as I know... Now to the problem of choosing which one can come with me. Possibly the dark grey Paddington depicted below:

I kind of jelly sandwiched a few of the stripes to add some depth. So, first a base of Paddington, some stripes, My Pointe Exactly, more stripes... I'd love to try this in even more steps when I have some more spare time.

Products used:
Nails Inc. Paddington
Depend Art Liner in white  
OPI My Pointe Exactly
Nails Inc. Chelsea Square

Abstract (V)

Greyscale

Made with thinned out polish, a tooth pick and a metal thread:

Products used:
China Glaze White on White
China Glaze Pelican Grey
Isadora Wonder Nail #65: Smoky Grey

2012/07/11

Gradient (I)

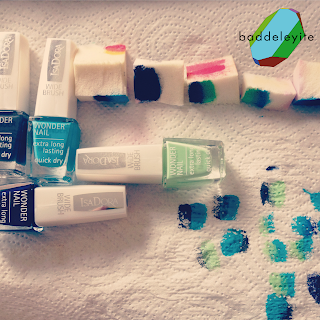
Swedish brand Isadora

Isadora products was the first make up I ever bought. To this day, the only mascara I use is Isadora (~12 USD) and Lancôme (~30 USD). So, it turns out I've lived through my teenage years and my twenties without realizing that Isadora also makes nail polish. I bought my first Isadora Wonder Nail just a couple of weeks ago, but am already smitten with both their colours and formulas.
It also turns out that the company is from Malmö. Hey, that's my hometown! I can't go more local unless I start frankening.
 
Gradient using Isadora Wonder Nail # 65, , 700, 702, and 729  
Another picture
Layniefingers has a good tutorial for sponging a gradient.


Product used:
Isadora Wonder Nail 65 Smoky Grey
Isadora Wonder Nail 700 Bel-Air Blue
Isadora Wonder Nail 702 Blue Jeans
Isadora Wonder Nail 729 Marzipan

2012/07/08

Abstract (III)


Two quick tutorials

Inspiration: tutorial requested by reddit user FreeBird69

Again, this is a spin-off of the mani shown below. Tutorial for the ring finger design can be found here. This post will show how to do the middle and pinkie designs.  
Original blogpost
  

Middle finger: Lollipop dots


Start with your base colour. I choose a neon (China Glaze Pool Party), so I painted my nails white first to make the colour pop. Sidenote: as you can see, I'm not ready to part from my ring finger blob design just yet.

Slap some french tips on. I used China Glaze Liquid Leather. There's tons of tricks for making french tips (including but not restricted to taping with hole reinforcements or tape cut to fit, or even stamping). However, I recommend freehand. It's easy enough and practice makes perfect!

Then, I randomly applied some white dots. I used the big end of a regular pin needle and China Glaze White on White which is nicely opaque.

Then use the other end of a pin needle to make tiny black dots in the centre of the white ones. I'm holding my home made dotting tool, but a regular needle of course works just as well.

Use a striper polish or brush to make small tails on the white dots as pictured. I used Depend Art Liner in white. If you like, you can wait until after this step to do the french tips, but as they are more prone and unforgiving to fuckups than the dotting and striping, I prefer it in this order.

Pinkie: geometric design

Start with a white base. I have two coats of ChG White on White.

When the white is completely dry, put a piece of tape vertically down the middle.

Paint black (I have ChG Liquid Leather) and remove the tape. Some like to wait until the polish is a bit dry, some do it at once. I've never had trouble either way so I don't have a preference.

You will end up with a nice geometric design like this (if not, you can easily use stripers to fix it, or hide it in the next step). Let's risk messing this design up in the next step!
I totally gif:ed this for you. If you're using the white striper, start in the white, close to the black, and drag over into the black - and vice versa for the black striper. That way you get nice pinch outs of the lines.
Here's the result.
And Bam!, that's it.
Just to conclude this weekend of 7 manis: in the end I went back to that blobalicious ring finger as the accent:

How McQueenish of me.

Products used:
China Glaze Pool Party
China Glaze Liquid Leather
China Glaze White on White
Depend Art Liner in black and White
China Glaze Pelican Grey
Isadora Wonder Nail 651: Silver Sparkles
Isadora Wonder Nail 65: Smoky Grey